How to Effectively Remove a Splinter: Proven Methods for 2025
How to Effectively Remove a Splinter: Proven Methods for 2025
Splinters can be frustrating and painful, but knowing how to remove them effectively is essential for proper care and to avoid complications. In this guide, we’ll explore various splinter extraction methods, offer tips on removing splinters, and provide detailed instructions for splinter removal. Whether you’re dealing with a splinter from wood, metal, or other materials, our tailored advice ensures you can tackle this problem readily and safely.
Understanding Splinters and Their Anatomy
Before diving into how to remove a splinter, it’s crucial to understand what splinters are. Splinters are small fragments that break off from materials (like wood or metal) and embed themselves into the skin. Commonly, splinter symptoms may include pain, redness, and swelling at the penetration site. The deeper a splinter penetrates the skin, the more challenging it can be to extract. Various factors like type, size, and material contribute to the difficulty of removal, and being aware of these aspects can set the foundation for effective splinter treatment.
Identifying Splinter Size and Type
The first step in removing splinters is correctly identifying both size and type. Generally, splinters can be classified as wooden, metal, or glass. You might experience a mild sting for small splinters or severe pain for deeper ones. If you’re unsure of the type or size, careful probing may help. Capture the essence of the splinter injury and choose your removal strategy accordingly.
Signs of Infection from a Splinter
Given that a splinter breaks the skin, it carries risks of infection. When removing a splinter at home, watch for potential signs like increased redness, warmth around the site, swelling, and pus. If these symptoms appear, it’s crucial to implement strict cleaning protocols, as infections can lead to complications. In such cases, seeing a doctor for professional splinter extraction may be required.
Common Myths About Splinters
Many myths surround splinters, often leading to suboptimal treatment. For instance, some believe that using a hot needle can make extraction easier. On the contrary, this might introduce more infection risk. Dispelling such misbeliefs about splinters is key to better management.
Effective Splinter Removal Techniques
There are various splinter removal techniques you can adopt based on the situation, ranging from household remedies to specialized tools. Understanding these options empowers you to manage the extraction process confidently.
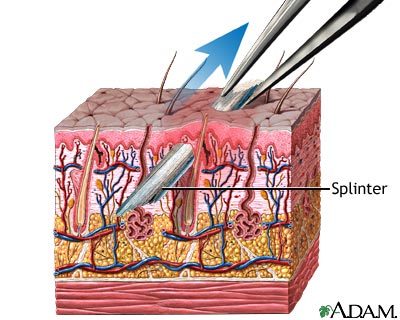
Using Tweezers for Splinter Removal
One of the most common and direct methods to pull out a splinter is by using tweezers. Begin by ensuring proper sanitation of the tweezers. Clean them with alcohol or boiling water. Grasp the splinter as close to the skin’s surface as possible, pulling it out slowly and steadily. For awkward angles, or stubborn splinters, adjust your angle to facilitate easier removal.
Home Remedies for Removing Splinters
Besides tweezers, certain household items can provide alternative splinter removal options. Products like baking soda or vinegar can actually draw the splinter to the surface. When creating a *baking soda paste for splinters*, mix equal parts of water and baking soda, apply it to the affected area, and cover it with a bandage. Leave it overnight; this can help in loosening the splinter while you sleep.
Using a Needle for Deep Splinters
For those particularly deep splinters that are difficult to reach, you may need a needle. Disinfect the needle before use, then gently widen the outer edges of the skin. It’s essential to reassure yourself (or your child, if you’re removing a splinter from them) of the approach you’re taking to make the process easier. Gently navigate toward the splinter and lift it out.
Aftercare: Essential Steps Following Splinter Removal
Once you’ve successfully removed the splinter, proper aftercare is crucial in preventing infections and ensuring swift recovery. This section details the best practices for after splinter care.
Cleaning the Splinter Wound
Cleaning the wound post-removal mitigates the risk of infection. Use lukewarm water and mild soap to cleanse the area. Applying an antiseptic ointment afterward helps safeguard against bacteria. Always monitor for any further complications, particularly for days following the splinter extraction.
Signs of Infection and When to Seek Help
Recognizing signs of infection plays a vital role in proper wound care. Symptoms such as swelling, oozing, increased pain, or fever after removal signal the need for medical evaluation. Seeking professional help early on may prevent more extensive complications.
Parental Guidance for Child Splinter Care
When it comes to splinter removal for children, it’s crucial to maintain a calm environment. Educate the child on what to expect and employ distractions or pain management techniques. Ensure thorough cleaning and care to instill safe practices at a young age.
Effective Prevention Strategies for Splinters
While understanding how to remove splinters is vital, knowing how to avoid them posits strong preventive measures. Here are some key strategies.
Avoiding Common Sources of Splinters
Being cautious in settings that frequently result in splinters can drastically reduce risks. Activities like woodworking, gardening, or even walking barefoot increase the likelihood of splinter injuries. Wear protective gear as a preventive measure, especially when dealing with materials prone to shedding shavings or fragments.
Using Correct Tools and Techniques
Limited familiarity with tools can go unnoticed until after an accident occurs. Engaging with professionals during DIY projects might lower injury risks. Also, maintain yard tools in peak condition to avoid losing pieces while in use. Investing in quality gear promotes safety.
Educational Outreach on Splinters
Education in schools and communities can effectively produce high awareness surrounding splinter risks. Share healthy practices and collaborate with community health recommendations to encourage safe habits amongst peers.
Key Takeaways
- Utilize proper tools like tweezers and needles for safe splinter extraction.
- Implement effective aftercare practices to mitigate infection risks post-removal.
- Engage in preventive strategies to lower chances of splinter injuries.
- Monitor for signs of infection and be vigilant when deep splinters occur.
FAQ
1. What is the best method for quick splinter removal?
The best way to remove a splinter quickly often involves using sanitized tweezers. If the splinter is visible and accessible, grabbing it directly with delicate but assertive pressure usually yields swift results. For particularly difficult cases, combining techniques, such as using a needle or home remedies, may be necessary to expedite removal.
2. How can I prevent splinters while doing outdoor activities?
Wearing protective gear, such as gloves and suitable footwear, significantly lowers the risk of splinters during outdoor activities. Maintaining caution around wood and metal materials is essential to avoid accidental injuries. Additionally, employing safe handling practices while using tools or equipment reduces common sources of splinters.
3. When should I see a doctor about a splinter?
You should see a doctor if the splinter is deep and you cannot remove it, if you develop troubling symptoms like an infection, or if a splinter causes significant pain or injury to sensitive areas (like the fingertips or around the eye). Professional assistance ensures proper treatment and healing.
4. Are there any over-the-counter treatments for splinters?
Over-the-counter treatments generally include antiseptic ointments to apply post-extraction to prevent infection. Always follow care instructions for each product, and consult healthcare providers for recommended treatments if complications arise.
5. Can salt help in removing deep splinters?
Yes, using salt can assist in drawing out deep splinters. Dissolving salt in water to create a saline solution and applying it underneath a bandage sometimes pushes the splinter closer to the surface, making it easier to remove. Remember to clean the area afterward thoroughly to maintain hygiene.